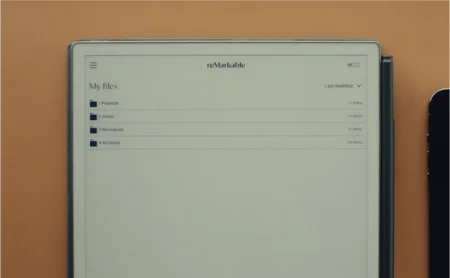
Organize all your files into four folders
Discover the PARA Method, a simple system for organizing all the notes and documents on your reMarkable paper tablet.
Look around your office. Is your computer monitor sprouting sticky notes? Do you have a binder full of printouts that don’t seem to belong anywhere, but might be useful in the future?
Now imagine if a colleague suddenly asked you to find files related to a random project from three years ago. Would you be able to?
With the right organizational system, you can cut the clutter from both your physical office and your paper tablet, and find any file in seconds. Read on to learn more, and watch the video above for a walkthrough.
What is the PARA Method?
The PARA Method is an organizational system developed by Forte Labs, the team behind the popular online course Building a Second Brain. The course helps people create a personal knowledge management system and eliminate information overload.
PARA is short for Projects, Areas, Resources, and Archives — and you’ll sort all your notes and documents into these four folders. This structure encourages you to organize what’s happening in your life into short-term projects and long-term goals, keeping you focused on time-sensitive tasks while also nurturing your hobbies and interests.
The PARA Method works whether you’re just setting up your paper tablet, or if you’ve used it for years. And once set up, the organizational system just works — for everything.
How to use the PARA Method on reMarkable
Let’s start in My files.
With the PARA Method, you’ll organize each new project in your life into its own folder — making the system perfect for the files-and-folders structure of your paper tablet.
For a layout that’s better suited for displaying lots of folders, try list view. Tap the sorting menu in the upper-right corner of the display, below the battery indicator. Under View, tap List.
Next, create four folders and name them:
- 1 Projects
- 2 Areas
- 3 Resources
- 4 Archives

Here’s a tip: Folders on reMarkable are always organized alphabetically. Adding numbers at the beginning of folder names keeps your folders in the correct order.
Now, tap 1 Projects, and start thinking about what’s on your to-do list.
Projects
This folder contains 10-15 important tasks you’re working on right now that have set deadlines and outcomes. Things like hiring a new office manager, writing an annual report, organizing a workshop, or a personal to-do like tidying the garage.
When a new project pops up, create a folder inside “1 Projects.” Title the folder with the name of the task, then fill it with all the files related to that project.
If you find that you have more than 15 projects in this folder, review your list with a critical eye and ask yourself:
- Am I working on this project actively?
- Does this project have a specific goal and deadline?
If you answered “No” to either question, the project may be more of an ambition, a hobby, or ongoing responsibility. In that case, it belongs in one of the other folders.
Areas
This folder also contains important tasks, but unlike projects, areas lack a defined deadline — they are ongoing responsibilities. This could be your finances, a training plan for hobbies like running and cycling, or team leadership duties at work.
Resources
This folder is a holding area for anything that could be useful for a future project. It’s also a great place to store anything you find interesting or inspiring, like books and articles you’ve read recently, note-taking templates, or topics you’d like to learn more about in the future.
Archives
When you’re finished with a project, area, or resource, move it over to this folder. Don’t delete; archive.
To move a project to the archives, long-press the folder, then tap Move in the action bar at the top of the display. Navigate to the archives, then tap Move here in the upper-right corner.
Over time, your archives will grow to contain every project you’ve ever worked on. Whenever you need to revisit a completed project or the associated files, you’ll find them all in your personal archive.
Bonus tip
Add tags to your project folders to make them even easier to find once you’ve moved them to the archives. For example, you can tag all your work-related projects with the name of your employer, and personal projects with a tag like “Home,” “Personal,” “Family,” and so on.
To tag a folder, long-press it, then tap Tag in the action bar.


